
Transactions
The transaction list is the working view of your books: every transaction, classified and ready.
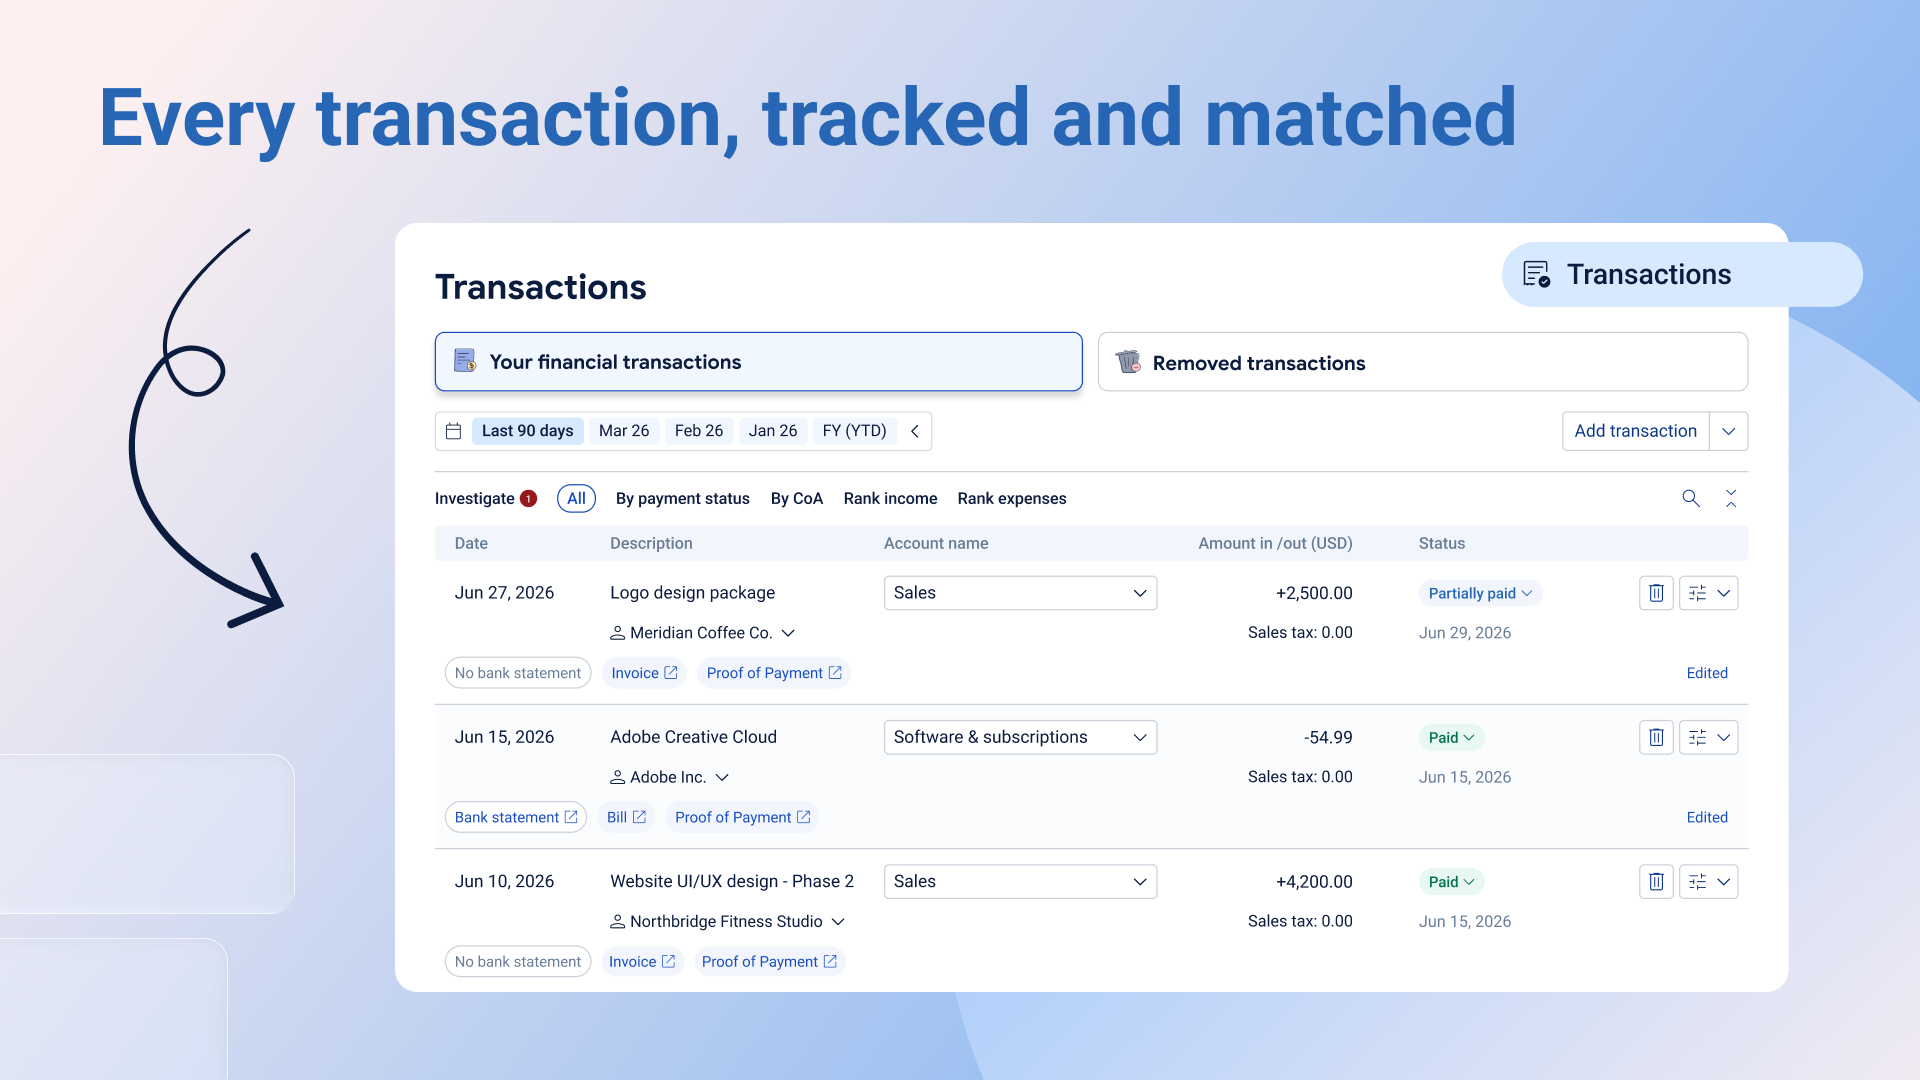
Using the transaction list
The transaction list is where you see every piece of money moving in or out of your business. Posted reads your source documents (like invoices, receipts, and bank statements) and turns them into rows you can scan, check, and act on. You don't need to enter anything by hand unless you want to.
How transactions get here
There are three ways a transaction can land on your list:
Your Posted inbox. Once you connect your Gmail, Posted reads business-related emails as they arrive and creates transactions automatically.
Drag and drop. Drop a file (PDF, image, CSV, and most common document types) into the sidebar and Posted will read it.
Adding one yourself. Use the "Add transaction" button if you want to upload a document or type in the details yourself.
New transactions appear on the list quietly, with no notification, so it's worth checking in on the list every so often.
Reading a transaction row
Each row shows:
Date. The date on the source document, for example the invoice date or receipt date.
Description, with the contact (customer or vendor) shown just underneath.
Chart of accounts. The category the transaction belongs to, such as "Office supplies" or "Consulting income."
Amount, with a plus or minus sign to show money coming in or going out. If the account is a revenue account, you will also see the sales tax collected underneath.
Status. Unpaid, partially paid, or paid.
Source documents. Small pills underneath the row show which documents are linked (for example, an invoice and its proof of payment). A bank statement pill always appears, with a check mark if it has been matched or a cross if it hasn't yet.
You can switch between a fuller view (with more detail per row) and a compact single-line view using the expand and collapse toggle at the top right of the table.
Two ways to look at your transactions
At the top of the page there are two view cards:
Your financial transactions. This is your main list.
Removed transactions. This holds anything you've removed, plus any line items Posted classified as personal. You can restore items from here or delete them for good.
Filtering and finding transactions
Date range. Choose "Last 90 days," a specific month, the current financial year, or set a custom range.
Filter tabs. Sort your list by:
Investigate – anything that needs your attention (see below)
All – everything, most recent first
By payment status – grouped into unpaid, partially paid, and paid
By chart of accounts – grouped by category, A to Z
Rank income – your biggest incoming amounts first
Rank expenses – your biggest outgoing amounts first
Search. Use the search bar to find a transaction by any field.
Adding a transaction yourself
Click Add transaction in the top right and choose:
Upload documents. Drag in up to five files at a time and Posted will read them and create a row for each one.
Start from scratch. Fill in the date, account, amount, status, and (if relevant) contact and description by hand.
If you set the status to partially paid or paid while adding a transaction, you'll be asked a quick follow-up question about how the payment was made (cash, or a proof of payment you can attach) before it's saved.
Editing a transaction
Most fields (date, description, contact, account, amount, tax, and status) can be edited right on the row. Just click the field, make your change, and click away or press enter to save. Pressing escape will undo an edit in progress.
A transaction shows an "Edited" note once you've changed something, and you can hover over it to see what changed and when.
You can't edit a transaction directly while it's in the Investigate state or in the Removed view. Those need to be resolved or restored first.
Understanding transaction status
Unpaid. Nothing has been paid yet.
Partially paid. Some money has come in or gone out, but there's a balance left.
Paid. Fully settled.
Click the status to change it. If you're moving a transaction to partially paid or paid, Posted will ask how you know. You can either say you received or made a cash payment (and give a date), or attach a proof of payment.
Click on a "partially paid" or "paid" status pill to see the full payment history for that transaction, including every individual payment and its date.
When Posted needs your help: Investigate
Sometimes Posted can't finish processing a transaction on its own, for example if it isn't sure which account to use, or if a payment doesn't quite match what was expected. When that happens, the row shows a red Investigate flag.
Click the Investigate button on the row to see what Posted found and what it needs from you. You'll usually see a short explanation and a few options to choose from, for example confirming an account, saying whether something is business or personal, or telling Posted how to handle an overpayment. Once you resolve it, the flag clears and the transaction moves back into your regular list.
A transaction marked "Not yet posted" hasn't been added to your books yet. It's waiting on you to fill in the missing piece.
Splitting a transaction
If one document actually covers more than one category (for example, a store receipt that includes both office supplies and a personal item), you can split it into separate lines. Open the row's manage menu and choose Split transaction. Give each line its own date, description, account, and amount, and mark any line as business or personal. The amounts need to add up to the original total before you can save.
Merging transactions
If you have an invoice or bill sitting separately from its payment, you can merge them into one settled transaction. Select the items you want to merge (either from the manage menu or by ticking the checkbox that appears next to eligible rows), confirm the details, and Posted will link them and update the status for you.
Removing and restoring transactions
Click the trash icon on a row to remove it from your main list. It moves to the Removed transactions view, where you can restore it any time. If you want it gone for good, open it in the Removed view and choose delete. This can't be undone, though your original documents in Gmail are never affected.
Attached documents
Click on any document pill under a transaction to open it or jump to the email it came from. If a document is missing (like a bank statement that hasn't matched yet), you'll see a crossed-out pill, just as a visual heads up. There's nothing to click there.